This light and airy Peppermint Whipped Cream is made from REAL candy canes and great on top of cupcakes, brownies and hot chocolate. Candy flavored whipped cream is one of the best kept secrets of the online baking community - and once you've tried it, it will soon become your new go-to frosting.

Jump to:
Flavored whipped cream is probably the best kept secret of the online baking community. Buttercream is good, but can easily get too heavy - and while I love cream cheese frosting, it just doesn't go with every flavor.
Flavored whipped cream, however, goes with just about everything - because you are in total control of the flavor.
And we're not just talking adding a bit of flavor to the whipped cream here. We're talking melting actual candy into whipped cream, creating a whipped cream that is MADE FROM CANDY.
How amazing is that?! For peppermint whipped cream it's candy canes, but you can just as well use any other candy or chocolate you like.
Why you will love this recipe
- Real candy cane flavor from using actual candy canes
- Lighter than a buttercream frosting
- More versatile than cream cheese frosting
- Easy to pipe even for beginners
- Great on top of everything! Add it to cupcakes, brownies or hot chocolate. Just like you would a regular whipped cream!
- Easy to make - you just need to plan ahead
What you need to make it
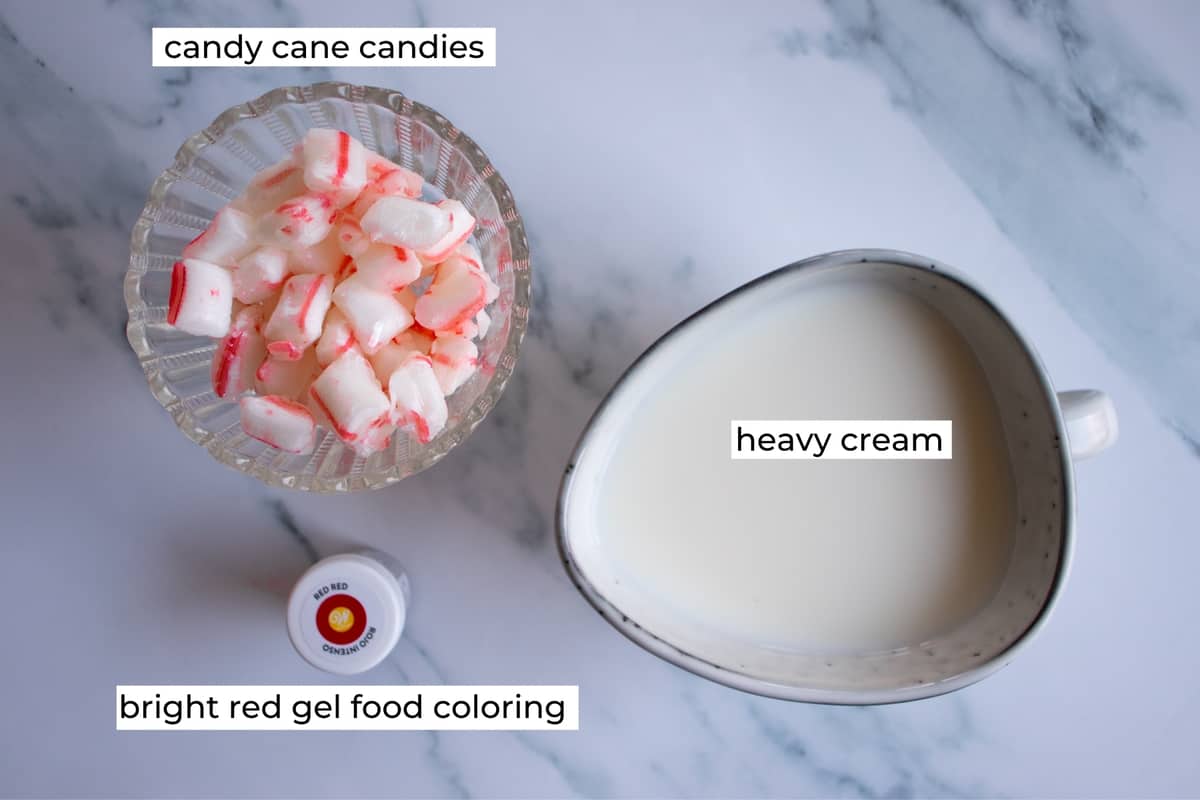
Ingredient notes & substitutions
- Candy canes - use the smaller candy cane candies or break candy canes into smaller pieces. They can be swapped for almost any type of candy that will melt - or chocolate.
- Bright red gel food coloring - you need gel food coloring for this, the liquid kind won't work. But, you can skip it as well, with no change to the taste. I like Wilton's Red Red* for a bright red stripe.
- Peppermint extract can be used instead of candy canes to get that peppermint flavor. It's quicker but the flavor is not as on point. If using peppermint extract, whip the cream first, then fold in peppermint extract and powdered sugar.
How to make it
Making this peppermint whipped cream starts already the day before - or at least 5 hours before you want to use it.
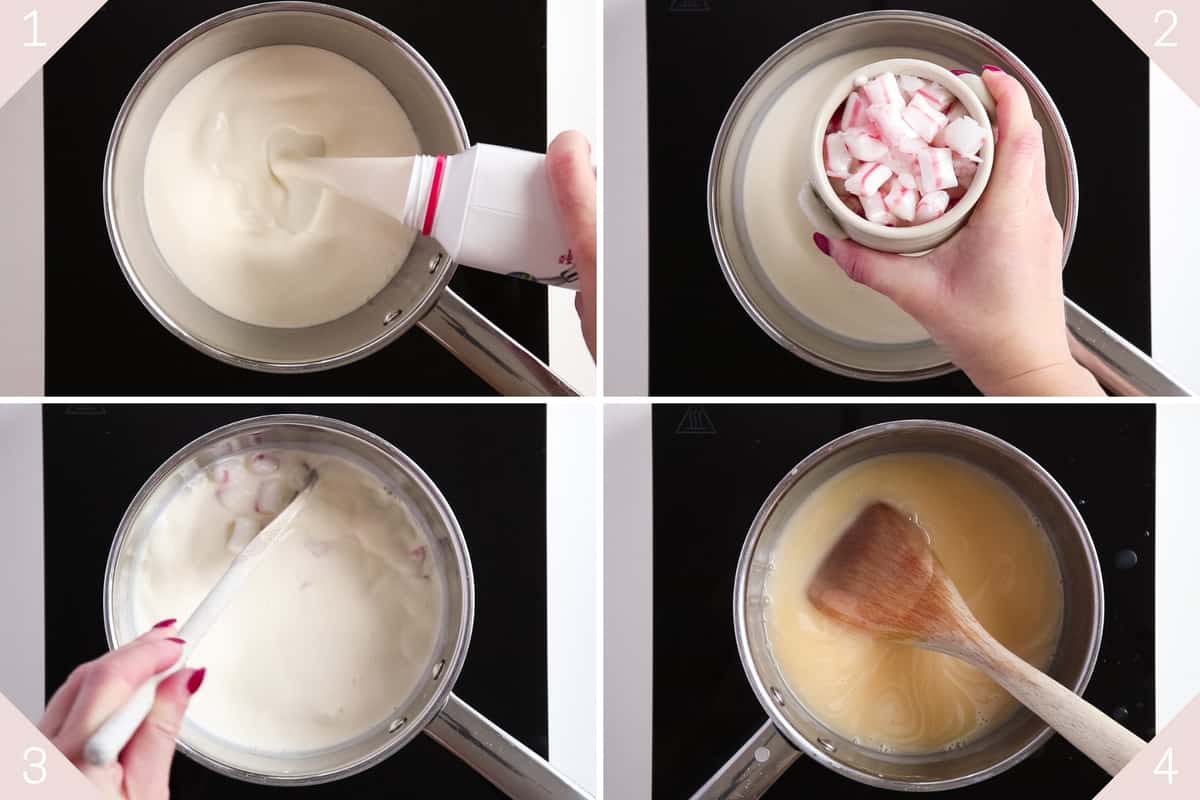
- Start by heating heavy cream in a pot over medium heat. Do not at any point let the cream start to boil! If it does, you might not be able to get a firm whipped cream later. So keep the temperature at medium or lower, and when you see steam coming off the cream keep a close eye on it, and lower the temperature if necessary.
- When the cream is so hot there's steam coming off it, add candy canes
- Allow the candies to melt, and mix often so they don't stick to the bottom
- When the candy canes are completely melted you are done for now and can turn off the heat. Set the cream aside to cool down, and then place in the fridge for at least 4 hours. If you can, leave it in there over night to ensure it's completely cooled.
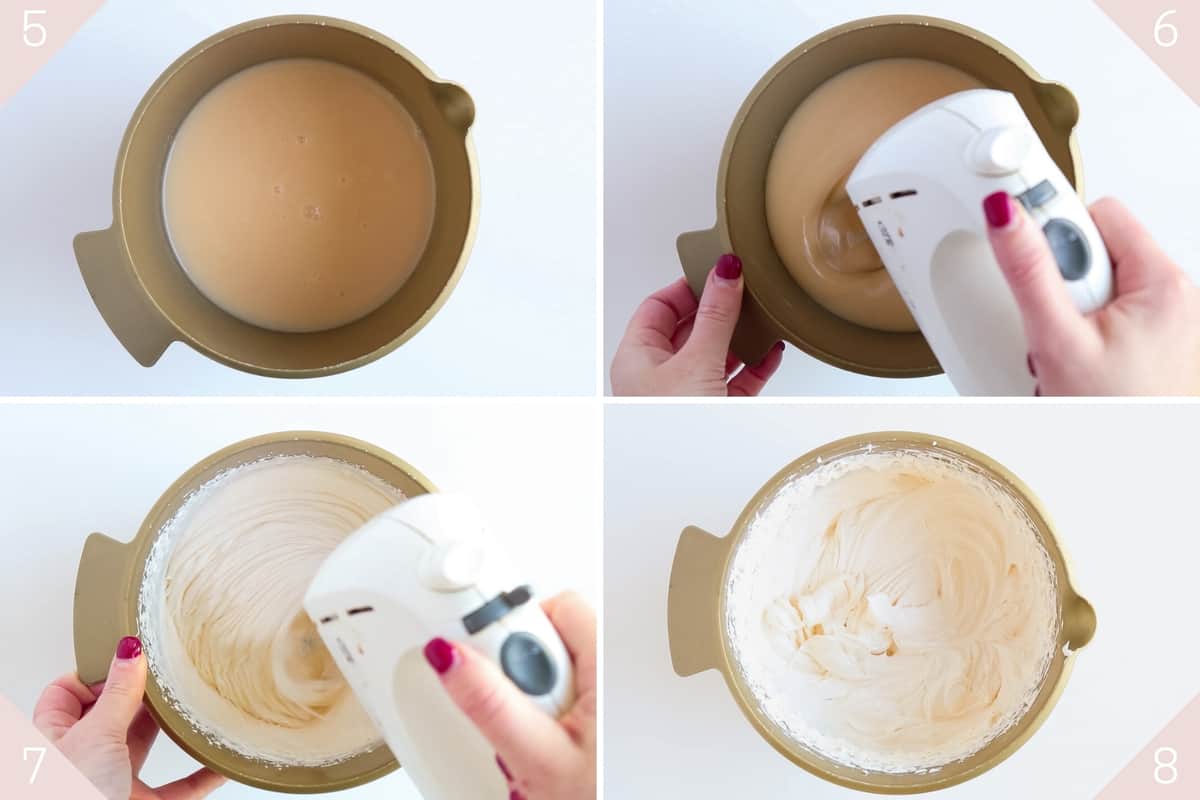
- When at least 4 hours have passed, bring the cream back out and transfer to a mixing bowl
- Whip it on high speed, like you would a regular whipped cream
- It might take a bit more time than usual, but after a while you will see peaks start to form
- And finally you end up with a nice, stiff peaks
Now, you can use the whipped cream just like this. Or you can add some gel coloring to it, to color all of it.
Or, you can pipe it with or without a red stripe ,as described below.
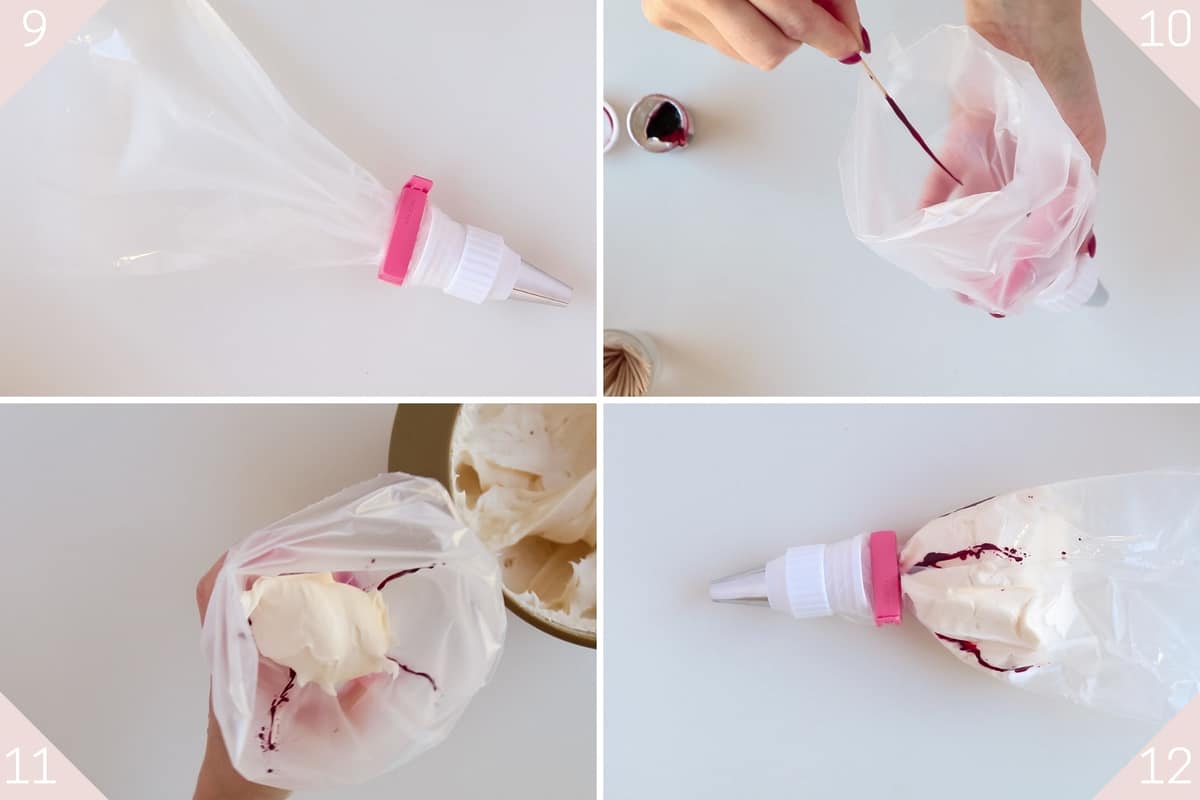
- Bring out 1 or 2 piping bags (I separate thewhipped cream into 2 bags when making a stripe, to ensure it stays crisp), and prep with an icing tip and/or connector. I also like to use a clamp to ensure the cream stays in place until I'm ready to start piping.
- To make stripes, dip a tooth pick in the gel coloring and paint 4-6 stripes on the inside of the icing bag. Try to get it as far down as possible.
- Then scoop in the whipped cream
- And you are ready to decorate cakes, cupcakes or whatever you desire.
Tips & tricks
- Do not let the cream start to boil! If it does, you will most likely need to start over. Just keep it at a steady temperature and when you see a lot of smoke coming off it you know it's time to remove it from the heat for a while.
- Let it cool down completely before whisking, otherwise it might break or just not get as stiff as you'd like. Leave it in the fridge overnight to be safe!
- Crush your candy canes before adding so they melt quicker
- Always use gel food coloring - not the liquid kind - to avoid changing the consistency of the cream
- Use two piping bags for one batch of this frosting to get really nice, bright, red lines on your candy cane frosting. Just make lines in both and add half of the frosting to each!
- Store leftovers in the fridge, in an air tight container or prepped in icing bags, for up to 5 days
Recipe FAQ
Yes! While peppermint whipped cream looks amazing with red stripes, it's just as delicious without.
Yes, you can store the leftover flavored whipped cream for 3-5 days in the fridge. So don't throw away any leftovers from icing your cake or cupcakes - save it and use it on top of hot chocolate or pancakes instead!
I like to prep any leftovers in an icing bag so I can just easily pipe it out whenever I need it.
Peppermint whipped cream is perfect to use as a topping for desserts like cakes, cupcakes and brownies or make indulgent breakfast pancakes. But my favorite way to have it? On top of a a steaming cup of hot chocolate.

More delicous holiday desserts
Looking for more delicious holiday desserts, like this Peppermint Whipped Cream?
- Candied Ginger
- Easy Vanilla Muffins
- Double Chocolate Chip Muffins
- Cranberry Cupcakes With White Chocolate Frosting
- Lussekatter - Traditional Swedish Saffron Buns
Did you love this recipe? Rate it five stars!
...and let me know what you loved about it in the comments.
Recipe

Candy Cane Mint Whipped Cream
Print RateIngredients
- 2 cups heavy cream
- 2 cups candy cane candies or crushed candy canes
- Wilton "red red" food coloring* or other bright red gel food coloring
Instructions
Melting
- Heat heavy cream in a sauce pan over medium heat. Do not at any point allow it to start boiling.
- When there is steam coming off the cream, _add in the candy cane candies and mix. Keep the cream hot without allowing it to boil, and stir often until all the candy has melted.
- When all candy has melted, take the pan of the heat and set aside to cool. When cooled place in the fridge for at least 4 hours to cool completely - even better if you can leave it there overnight.
Whipping (at lest 4 hours later)
- Bring out the cooled down cream and whip to desired consistency.
Making stripes (optional)
- Bring out a piping bag and fit it with the tip of your choice. Then paint four red lines on the insides of the bag using a tooth pick dipped in the red gel food coloring. Carefully spoon in half of the candy cane whipped cream. Pipe out as desired, and then repeat with a new piping bag for the other half of the whipped cream.
Equipment (may contain affiliate links)
- Tooth pick
Notes
Ingredient notes & substitutions
- Candy canes - use the smaller candy cane candies or break candy canes into smaller pieces. They can be swapped for almost any type of candy that will melt - or chocolate.
- Bright red gel food coloring - you need gel food coloring for this, the liquid kind won't work. But, you can skip it as well, with no change to the taste. I like Wilton's Red Red* for a bright red stripe.
- Peppermint extract can be used instead of candy canes to get that peppermint flavor. It's quicker but the flavor is not as on point. If using peppermint extract, whip * the cream first, then fold in peppermint extract and powdered sugar.
Tips & tricks
- Do not let the cream start to boil! If it does, you will most likely need to start over. Just keep it at a steady temperature and when you see a lot of smoke coming off it you know it's time to remove it from the heat for a while.
- Let it cool down completely before whisking, otherwise it might break or just not get as stiff as you'd like. Leave it in the fridge overnight to be safe!
- Crush your candy canes before adding so they melt quicker
- Always use gel food coloring - not the liquid kind - to avoid changing the consistency of the cream
- Use two piping bags for one batch of this frosting to get really nice, bright, red lines on your candy cane frosting. Just make lines in both and add half of the frosting to each!
- Store leftovers in the fridge, in an air tight container or prepped in icing bags, for up to 5 days
Nutrition
Nutritional information is approximate and automatically calculated, and should only be viewed as an indication.



Sophie
Love seeing these wonderful Christmas-ey desserts around this timeframe. Thanks for the recipe.
Jen
I actually ordered candy canes and they arrived broken so this is the perfect way to use them up. Thanks for the tip about using the food coloring in the piping bag. Such a cute touch.
Dannii
How cute are these. I am going to try making them with my daughter tomorrow.
David
What a great idea! There always seem to be extra candy canes around this time of year. A tasty way to re-deploy them! So festive.
Jacqueline Dooley
What a fantastic idea, I would never have thought of that. I am imagining serving it with my self-saucing chocolate pudding or on a hot chocolate. Yum!
Emmeline Kemperyd
Sounds perfect with both! I will have to try it with some chocolate pudding as well - that's a new one for me!